Power bleaching
The main advantages of the power bleaching technique are:
- The time factor – produces immediate results in the clinic, which means your teeth get whiter straight away rather than taking a few weeks; and
- Avoiding problems with home bleaching procedures such as:
- Wearing trays that may cause you to gag; and
- May give you a bad taste in your mouth.
Disadvantages of power bleaching include:
- The high concentrations of hydrogen peroxide makes protecting your gums really important and it is important the dentist has experience in this area;
- Requires a long time at the dentist clinic, and is relatively expensive; and
- Dehydration of teeth that results after power bleaching will cause the teeth to look whiter immediately following power bleaching and most likely your teeth will become slightly darker over the next couple of days.
The safety of the bleach used in power bleaching has been shown to have no proven adverse effects on the enamel or dentine, that is, it is perfectly safe for your teeth.
Hydrogen peroxide is more widely used as the power bleaching agent, but the concentration will vary from dentist to dentist, and the times used for the bleaching will vary as well.
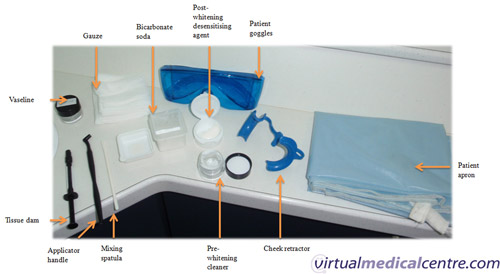
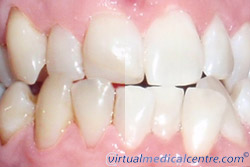
Note: the various materials required for one system of power bleaching (click on picture to view larger image).
Information on re-publishing of our images
The procedure
The generalised procedure for power bleaching is:
- The dentist first conducts a full clinical examination and determines the cause of the discolouration. It should be decided if bleaching is the best method treatment for this patient, for example, perhaps veneers and crowns may be a better alternative.
- The dentist will take photographs before your whitening treatment so that you may compare it with the end result.
- External stains are removed using a polishing paste.
- Lip retractors and cotton are placed in your mouth to protect the gums and the inside of your lips and cheeks.
- Further protection is provided by gauze and cotton wool that the dentist places in your mouth.
- You can ask for some Vaseline on your lips to prevent cracking or drying out.
- Depending on the type of power bleaching procedure used, or the dentist’s particular preference, there will be something used to protect the gums completely by isolating the teeth being whitened. These include:
- Rubber dam – which is often a piece of latex that is put around all the teeth which are going to get whitened. A rubber dam cannot be used when top and bottom teeth are bleached.
- Tissue dam – this is a painted on white material that protects the gums and allows both top and bottom teeth to be isolated for bleaching.
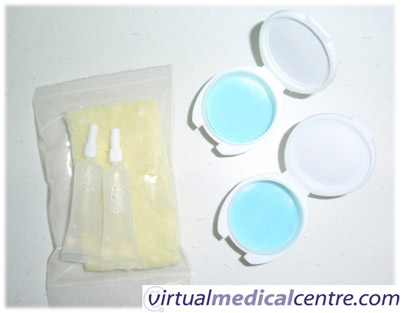
- Bleaching cycle: the bleaching agent is then applied to the teeth.
Note: premixed agents including powder and liquid combination.
Information on re-publishing of our images
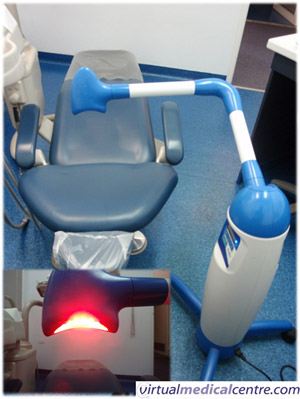
- Sometimes a light source or a laser source is placed onto the tooth to help activate the bleaching agent.
Note: light source is used at times to activate the gel depending on the system used.
Information on re-publishing of our images - The gel is left in place from 3-20 minutes depending on the concentration of hydrogen peroxide.
- Following that time, the dentist will wash away the gel and then gently air dry them. You may feel some sensitivity at this stage.
- The cycle will be repeated 2-5 times, depending on each system. Unfortunately, the sensitivity will most likely get worse after each application.
- Sometimes a light source or a laser source is placed onto the tooth to help activate the bleaching agent.
- After the bleaching is completed, the equipment is removed from your mouth, and at this stage the dentist will check your mouth for any irritations from the bleaching agent.
- Areas of damage will be washed copiously with water, and Vitamin E or bicarbonate soda is usually applied to these areas.
- Most people will usually have some degree of sensitivity at this stage, and a fluoride or potassium nitrate containing toothpaste can be used to minimise the discomfort for you.
- At this stage, the final pictures and shade will be recorded by the dentist, and you will be shown how much improvement has occurred. The amount your teeth whiten varies from person to person, but you should be able to see a difference.
- You will be advised about the following things after the appointment and you should take careful note of them:
- For sensitivity, you should use a fluoride gel or potassium nitrate containing toothpaste.
- Avoid acidic drinks, fruits, tea, coffee and smoking for 48 hours.
- The shade often gets slightly darker within a week to ten days.
- Information on home bleaching will be given to you, and this is strongly recommended otherwise your teeth will most likely get darker.
 |
 |
|
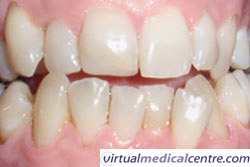
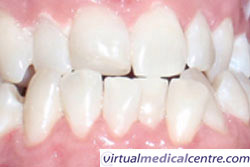
| Figure 2: Pre-bleaching | Figure 3: Post-bleaching |
|
| Note: the dramatic change caused by power bleaching. | ||
Side effects
Gum damage can be a feature of power bleaching, but can be avoided largely by good isolation by the dentist (using the rubber dam or tissue dam). It is difficult to avoid gum irritation completely.
Note: the areas on the gum where it is white caused by seepage of the peroxide agent.
Information on re-publishing of our images
Tooth sensitivity has been reported at in about one in five people who have home bleaching, and the levels of sensitivity appear to be similar to those encountered in home bleaching.
 |
For more information, see Tooth Sensitivity (Dentine Hypersensitivity and Pulpal Disease) |
More information
 |
For more information on various bleaching techniques for teeth, including home bleaching, assisted bleaching, power bleaching, the thermocatalytic technique and the walking bleach technique, see Teeth Whitening. |
References
-
Kihn PW. Vital tooth whitening. Dent Clin North Am. 2007 Apr;51(2):319-31, viii.
- Sulieman M. An overview of bleaching techniques: 3. In-surgery or power bleaching. Dent Update. 2005 Mar;32(2):101-4, 7-8.
- Sulieman M, Addy M, Macdonald E, Rees JS. A safety study in vitro for the effects of an in-office bleaching system on the integrity of enamel and dentine. J Dent. 2004 Sep;32(7):581-90.
- Pretty IA, Ellwood RP, Brunton PA, Aminian A. Vital tooth bleaching in dental practice: 1. Professional bleaching. Dent Update. 2006 Jun;33(5):288-90, 93-6, 99-300 passim.
- Sulieman MA. An overview of tooth-bleaching techniques: chemistry, safety and efficacy. Periodontol 2000. 2008;48:148-69.
- Tavares M, Stultz J, Newman M, Smith V, Kent R, Carpino E, et al. Light augments tooth whitening with peroxide. J Am Dent Assoc. 2003 Feb;134(2):167-75.
- Gallagher A, Maggio B, Bowman J, Borden L, Mason S, Felix H. Clinical study to compare two in-office (chairside) whitening systems. J Clin Dent. 2002;13(6):219-24.
All content and media on the HealthEngine Blog is created and published online for informational purposes only. It is not intended to be a substitute for professional medical advice and should not be relied on as health or personal advice. Always seek the guidance of your doctor or other qualified health professional with any questions you may have regarding your health or a medical condition. Never disregard the advice of a medical professional, or delay in seeking it because of something you have read on this Website. If you think you may have a medical emergency, call your doctor, go to the nearest hospital emergency department, or call the emergency services immediately.

